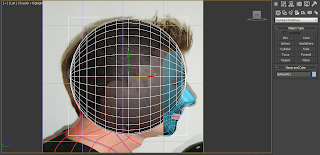
Once the modelling of the face was to a satisfactory finish, it was now time to begin the process of creating the rest of the head.
The rest of the head requires the use of Photoshop in order to create guidance lines so that a sphere can be used to produce the rear of the head and speed up the modelling process. The overall shape of my head in Photoshop was draw out using the pen tool and red paint in quads across the head and down the neck. this would give me guidance in modelling the head and where to create the polygons.
Photoshop splines creation can be seen below.
In this stage the back of the head begins as a sphere. The sphere was selected from the sphere tool and was placed on the scene. Using the ‘scale’ tool the sphere could now be scaled down to size and with the aid of the move tool moved into position and aligned to the back of the head. It was important to ensure that the sector of the sphere where the edges joined (top and bottom) were located at the sides where the ears would be. The sphere was moved using the rotation tool.
The number of segments that built up the sphere had to be reduced using the modify panel so that when connecting it to the head the segments would align to those on the face.
Converting the sphere to an editable poly using the ‘edit poly’ modifier allows me to deleted the sectors of the sphere were the segments joined to the centre of the sphere. This created a hole in the sphere where the ears would later be placed and allows open polygons for the ears to be later welded into place.
Before Deletion
After deletion
With the sphere now converted to an editable polygon it could now be modified to shape it to the face. This process was done by deleting unnecessary sectors of the sphere by using the polygon tool and the spray can tool to select polygons to delete more quickly.
The image below shows the location of the paint tool.
Now using the vertex points the sphere could now be shaped and the edges welded to the sides of the face to create the back of the head.
Welding vertex pointsOnce this process was completed, using the ‘edge’ tool in editable poly mode and holding down the ‘shift’ key the edges of the polygons on the sphere could now be extruded to create additional polygons that would now begin to build the structure of the neck and shoulders. This section of the model was difficult as the reference images did not give much detail to model on, such as should bones and neck shaping etc. Shaping of the neck and shoulders were made by using the move tool and adjustments to the vertex points of the polygons. The image below shows the process of the neck and shoulder creation.
During this process it was necessary to create extra edges that looped over the head. This enabled the rear of the head to have more adjustments points and would later ensure the modelling and smoothness of the head would be more accurate. This process was done by selecting the edges where new rings of edges were required. By clicking the ‘ring’ tool in editable poly modifier enable a loop of the edges to be selected and using the ‘connect’ again allows extra edges and polygons to be created over the rear of the head.
The picture below shows this more accurately.


No comments:
Post a Comment